Wednesday, October 1, 2014

Pumpkin Cheesecake!

 I don't know if I've mentioned this before...but I sincerely
love, Love, LOVE Fall!  
Really, I do...
Something about the winds of change,
leaves changing color and blowing about on a gusty day...

There's also all the fall fashionable clothing that
begins to make appearances...boots, pull over hoodies, 
gloves, scarves, beanies...

Another beautiful thing I indulge in:
Bon Fires!  
Around here, we like to have a bunch of friends come hang 
out in our back yard...chill out in the hammock 
and lawn chairs all to roast marshmallows
and make some S'mores!
Nothing feels more like home...friends & family just having a 
perfect night of food, laughter & gorgeous weather!
In my humble opinion, I like to char my mallows just 
a tad bit~takes me back to my 
grandma who used to 
always say that charred food is good for the heart!
I have no idea how true that might be, if at all, but hey...
it's a wonderful memory of my grandma...so don't
harsh my mellow...er, mallow in this case ;)

Then, there's all the flavors of Fall...
Pumpkin, Maple, Pecan...mmm hmmm
I'm drooling just thinking about
all kinds of deliciously flavored cakes, pies, 
cookies, muffins...
Oh and the aromas...........

*** La dee dee, dah ***

Okay, sorry about that, I got lost for a bit
but I'm back!

Unfortunately, the sad truth is that I live in a part of the country
where we don't see much of leaves turning all those wonderful
reds, browns and golden colors...
I do, however, break out my fall weather apparel as soon
as the first break in temperature
comes around...boots 
and all ;)
I take advantage of the cooler nights to be outside...
in my hammock...
listening to my iPod...
or reading...
(who am I kidding, I'll more likely be playing a farm game on my phone)
with a small, cozy blanket...

This cooler weather enables me to crank my oven on,
open up the windows and my
sliding doors as well.
 I'm not gonna lie, 
a part of me likes to do this just to remind my neighbors that 
Fall has arrived
as the cooler breeze carries warm scents of 
 Pumpkin Pies...
No, Pumpkin Cheesecake
into their homes and permeates everything 
around them!
To some, that might be considered mean and cruel, 
but hey, I call it sharing!
It's a friendly reminder that something Fantastical
(it's a word in MY vocabulary, don't be jelly ;)
 is coming out of my oven, 
so it's time for them to jump on it and do the same!

No?  Okay,
well how about I just share my favorite fall recipe with you...
well, one of them anyways, and maybe you can tease
your neighbors same as I do :)

Pumpkin Cheesecake!
I say Yea-uh!

Ingredients:

*1/3 cup Pecan Chips
*12 tbsp Unsalted Butter
*2 1/2 cups Graham Cracker Crumbs
*2 3/4 cup Sugar
*1 1/4 tsp Salt
*2 lbs Cream Cheese (yes, pounds!)
*1/4 cup Sour Cream
*1 can Pumpkin Puree (15 oz~I use Libby's)
*6 eggs
*2 tsp Vanilla Extract--Pure
*1 1/2 tsp Maple Flavoring
*2 1/2 tsp Cinnamon
*1 tsp Ground Ginger
*1/4 tsp Ground Cloves
*2 cup Heavy Cream

Directions:

*** Using a small pan, (medium-high heat) toast pecan chips being careful NOT to burn them...
once you start, do not walk away as you'll need to stir them around.  When done, pour out
onto a paper towel lined plate & set aside to cool.


*** Set cream cheese on counter to come to room temperature,
and measure out the eggs into a bowl and beat with
a fork lightly, and set aside.

*** Position a rack in the center of the oven and preheat to 325 degrees Fahrenheit.

***Melt butter and brush a 10-inch springform pan with some of it. Stir the
remaining butter with the crumbs, 1/4 cup of the sugar, 1/4 tsp (pinch) salt and the toasted pecans
in a bowl. Press the crumb mixture into the bottom and up
the sides of the pan, packing it tightly and evenly. Bake until golden brown,
15 to 20 minutes. (Use this crust baking time to get the filling prepared)

*** While the crust is baking, bring a medium pot of water to a boil.

*** Meanwhile, beat the cream cheese with a mixer until smooth. Add the
remaining 2 1/2 cups sugar
and beat until just light, scraping down the sides of the bowl
and beaters as needed. Beat in the sour cream, then add the pumpkin, eggs,
extracts, 1 teaspoon salt and the spices and beat until just combined.
Set aside this filling in the fridge until the crust has
finished baking.  

*** Once crust is done baking, remove from oven
and cool on a wire rack, about 15 minutes or so.
Wrap the outside of the springform pan
with foil and place the springform pan into a roasting pan
that is at least 2-3 inches deep. (Note:  It's best if the foil
that is used is wide enough to cover the bottom of the springform pan
so as to prevent the seams from absorbing some water 
that MIGHT work it's way into the foil wrapping,
which may give a slightly soggy crust.  I use the Heavy Duty Foil 
that comes packaged as 75 sq ft, which is
18 in wide~wide enough to cover my 10-in springform pan
with a few inches to spare!  I then make 2 layers, 
for added protection, because that's how I roll ;)

*** Remove filling from fridge and give it a quick stir then
pour into the cooled crust.

*** Gently place the roasting pan (with the filled springform pan inside it) into the
oven (don't pull the rack out) and pour the boiling water into the roasting pan, being careful
not to splash water into the cheesecake pan.  Keep pouring in the hot water
until it comes to about halfway up the side of the springform pan.

*** Bake until the outside of the cheesecake sets but the center is still loose, about 1 hour 45 minutes.

*** Turn off the oven and open the door briefly to let out some heat. Leave the cheesecake in the oven for 1 more hour, then carefully remove from the roasting pan and cool on a rack.

*** Run a knife around the edges then unlock and remove the springform ring.
 Cover and refrigerate at least 8 hours or overnight.

*** Bring the cheesecake to room temperature 30 minutes before serving.
To finish, place a dollop of the whipped cream on each slice and sprinkle with some more
toasted pecans, if desired.

I can't take full credit for this recipe...I took it from the wonderful
people here and slightly adapted it to fit my
taste preferences!


There you have it!  Nothing says Fall like a creamy, delicious
Pumpkin Cheesecake!

In my opinion, if at all possible, do not skip toasting the pecans...
they add such a wonderful depth of flavor and a nice little
crunch~~unless of course, you're allergic to them...or just don't like them,
then definitely leave them out!

Hope you try this recipe out...let me know what you think ;)


 Thanks a million for indulging me by reading clips of my life!

Love ya,
Cori ;)


Monday, June 9, 2014

Long Time Gone...


I'm so, so, so sorry for neglecting you...
yes you...my ONE loyal
follower!  

Where have I been?  Loitering around here in my humble abode...
just not here, as in "at my desk".
Why not?  3 Reasons:  

#1:  We rearranged furniture here in my living room area
and I had this brilliant idea to move
my desk along with my desktop
over to this side of my living room...ya know, 
between my sofa and kitchen table (which I rarely eat at...yes, I
know...but that's a story for a different day ok), up against the wall, 
by the window...side window, that is.
My home isn't very big, so
space is a little tight!
Don't get me wrong, I liked this layout...just out of the way which
I must say, did seem to flow very nicely, but......
didn't work out well for my blogging.
So, I plan to rearrange my 
furniture...in the near future!!
(Shhhhh....my husband doesn't know that yet ;)

#2:  Things here in the Casa de Pullin (as we like to call it) have been 
"Cray-Cray" this past year.  My husband, who is a retired
firefighter, had some serious mobility issues
that resulted from an injury he 
sustained while on the job...
well they got worse!  Around the same 
time, there were some other
family health issues that also came to 
light...You know that saying:
"When it rains......."
Well, to put it simply...
that's a little thing we call Life!  Needless
to say, we are still here...for now ;)

#3:  Despite having a smartphone & tablet, I have
been unable to get in here and send 
you a little note.  Not because I can't access
my blog on either device...it's just that 
the keyboard is too tiny & that, my friend, frustrates me...
more than I care to admit.  I will inform you, 
though, that about 2 months
ago, I came in here and posted, but...
my internet glitched...BIG TIME
and everything...and I mean
EVERYTHING I had typed was lost!
You know how that goes...I 
gave up and figured I'd 
re-apologize at some later point in time....
(today ;)

Now, on to what I intended to share with you today...

I have a recipe to share with you today!
Yes...I'm sharing!!! 
Woo-hoo ;)

Well, hold on to your excitement...I know
deep down inside, you're at the edge of 
your seat! I'm just that interesting ;) 

I'm really excited to share this recipe with you
and I hope it's one you 
try out....and I encourage you to give me 
some feedback as to how it turned
out and what you thought 
of it. 

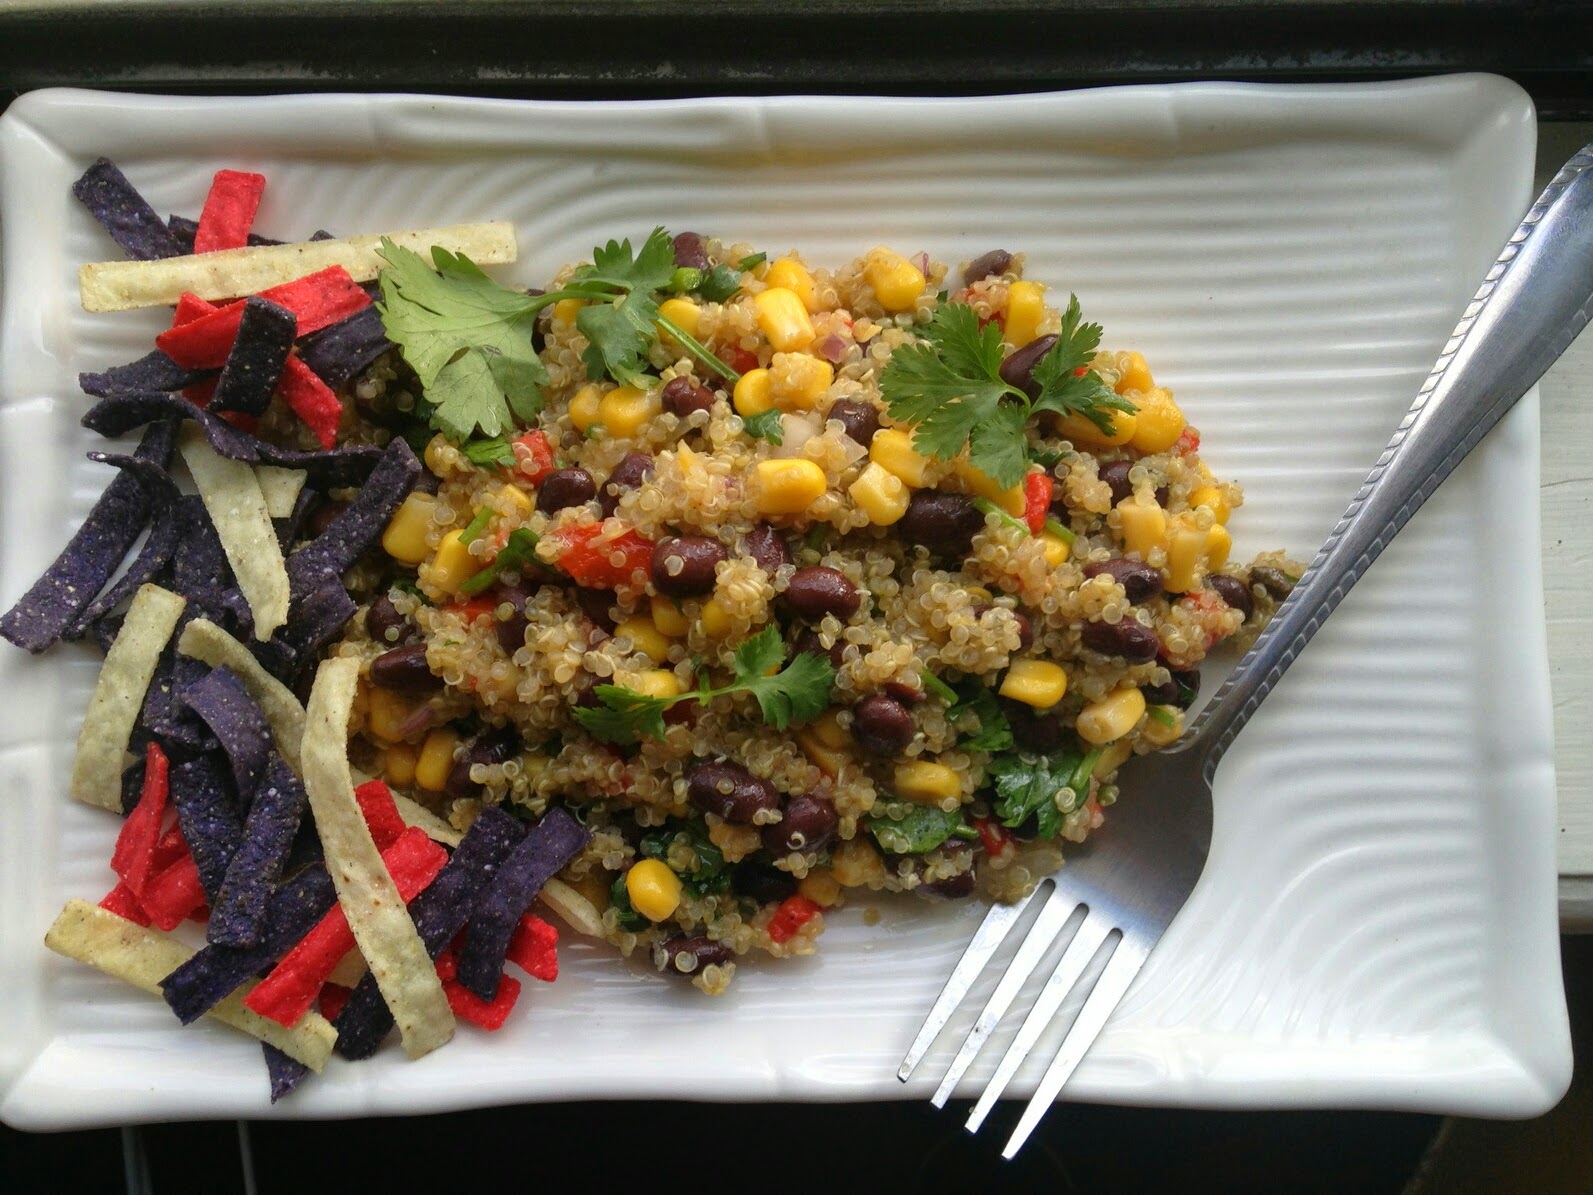
Quinoa Salad
(pronounced keen-wa)

What is it?  It is a tiny type of grain that is a great source
of iron and protein.  It is also a gluten-free seed.
(A word of caution:  If you're not too familiar with Quinoa,
then I suggest that you buy the one that has been pre-rinsed!  
It should say on the package if it is.  I bought some that wasn't and 
I guess I didn't rinse it long enough or something because
it had a bitter taste...not good!  Personally, I like to use
Bob's Red Mill brand.  One 26 oz bag
is good for a few recipes)


Ingredients:
1 cup Quinoa, uncooked seeds 
2 cups Chicken Broth
1 can Sweet Corn, drained
1 can Black Beans, drained and rinsed
1 Roasted Red Bell Pepper, diced (I use the jarred kind)
1/4 cup Red Onion, diced
1/2 cup Cilantro, chopped
1/2 Olive Oil, extra virgin
Juice of 1-2 Lemons
Salt & Pepper to taste

Directions:
Cook the Quinoa:
In a medium sauce pan, bring the chicken broth to a boil.  
Add the quinoa and return to stove.  Once it begins boiling 
again, cover with a tight fitting lid and reduce heat
to medium.  Simmer for about 12 minutes, or until all
liquid has been absorbed.  Remove from heat and let it sit 
covered & undisturbed for about
10-15 minutes.  

In the meantime, while quinoa is resting, you
can begin working on the rest of the ingredients.
You will need a nice sized bowl for this ;)  Drain corn and place 
inside bowl.  Drain and rinse the black beans and place 
them in the bowl as well.  If you bought the roasted 
red bell peppers that come in a jar, just remove 
one, (making sure no seeds are present)
dice it up and place in the bowl.  Do the same 
with the red onion and cilantro.   By this time, your
quinoa should be ready.  Uncover and fluff it up with a 
fork and put it in the bowl as well.  Juice one lemon, being
careful to remove seeds....(don't want to break a tooth biting 
into one of those little suckers!) and pour it,
You guessed it, the bowl too!  Sprinkle salt and pepper 
according to what your taste buds prefer ;)
Then, pour in olive oil and give it all a nice stir, making
sure it's all combined nicely.
Taste & make adjustments if needed...adding more
oil, salt, pepper and/or lemon accordingly!

Then, enjoy immediately while it's still warm...
or cover and place in fridge to get cold!


I like it fresh and warm...my kids like it cold, so it's really up to 
what you prefer.  I will add that an excellent suggestion 
is to get yourself a heat proof plate, layer a handful
of tortilla chips (as pictured above),
 serve a nice amount of this mixture over them,
then top with shredded chicken,
and some shredded cheese (Mexican blend works nicely, but 
up to your personal buds ;) 
Put this plate in a toaster oven (or your regular oven) and 
broil for a couple of minutes or until your cheese is 
nice and melted...not burned, unless you like
it that way.....
and enjoy!

Easy peasy!! On a side note, this recipe is
so forgiving that you can adjust the amounts of the
ingredients according to what pleases you....
If you like more cilantro,  then add some
more...not a fan of it, swap it out
for parsley! I'm sure there's
a beautiful way to enjoy this tasty...
and healthy grain ;) 

Well, that's it!  It's a healthy and delicious salad that 
goes well all by it's lonesome self...
or as a side dish...
or as I suggested...under all that 
gooey cheese and chicken...
I tell you, those chips give it a nice crunch!
It's a win-win with this recipe,
well, in this home it is anyway!

I hope to get some feed back...
comments, questions, suggestions.........
they're all welcomed ;)

Thanks for using some of your precious time to let me bore you 
for a few minutes...
Let me do it again some time ;)

Love Ya,

Cori ;)


Tuesday, February 19, 2013

Macarons!

First off...I gotta be honest & say~I had never heard of Macaron's...much
less, tasted one!  That is until I heard the word on
a TV show.  That got me thinking...which led to my being curious...
which led to me googling the term...which, in turn,
confused me a little bit! 
Apparently, there's Macaroon's and then there's Macaron's!
Who woulda thunk it, right? 
 
Well, when I saw a picture of a coconut macaroon...I quickly
flashed to a childhood memory of grocery
shopping with my grandma~
putting a package (or a couple) of some coconut cookies into
the cart.  They were super
chewy & my grandma would buy them...
all.  the.  time.  No joke!  I remember she had a thing for coconut!
(so that's what they're called, hmm)
Even those sweet Neapolitan coconut candies...
you know, the ones that were
pink, white, & brown striped...
Yea, those~she LOVED them!
 
Then there was a picture of the Macaron...the fancier one...
and oh, my!  So pretty! Colorful, too!
There are a lot of articles out there that differentiate what
each one is...and, I'm sorry, but in my opinion
(& don't hate me for this)...but I.  don't.  care.
 
Really, one has coconut and dipped in chocolate (preferably)...
the other is so pretty & colorful...& has a filling!
So they're two different cookies...I'm not
prejudiced!  I'll bake & eat them both...willingly!  
 
 I've read various articles/recipes/posts about them
& all I kept reading was about how
difficult they are to make!  What~a~turn~off!!
And, I don't know about you, but I HATE failure!
It really bothers me when
something I bake doesn't turn out right~just ask one of my kids...
or my hubster~~they'll tell you how I snappy I get..concur!
 
Now, I like to read baking/cooking blogs...
& needless to say, I ran across one that specifically discussed
Macaron's. I went over all the info
on them. I debated for....ever... as to whether I should try
making them or not.  Till finally, I figured
"Por que no?"  I followed the advice & tips that Stella
over @ Brave Tart (http://bravetart.com/recipes/Macarons) so
kindly offered & got to it! 
 
This is how they looked when I piped them out. 
I managed to get 3 cookie sheets out of this batch of batter.
 
This is the first pan, out of the oven.
They're broken & collapsing...AND....they have no feet :(
 
2nd pan out of the oven had some of the same, but
about half of the pan, actually had some feet and
nice round domes.  But I didn't get a picture
of that one...yes, I know, I know...I'm bad
about taking pictures..bad about posting regularly...
how about a random act of kindness &
forgive me?  ..(is that considered random...hmm,
good question..but for consideration another day;)
 
Onward...this is my 3rd pan...if you look closely,
you'll see the little feet underneath
the round tops...Aren't they cute!!


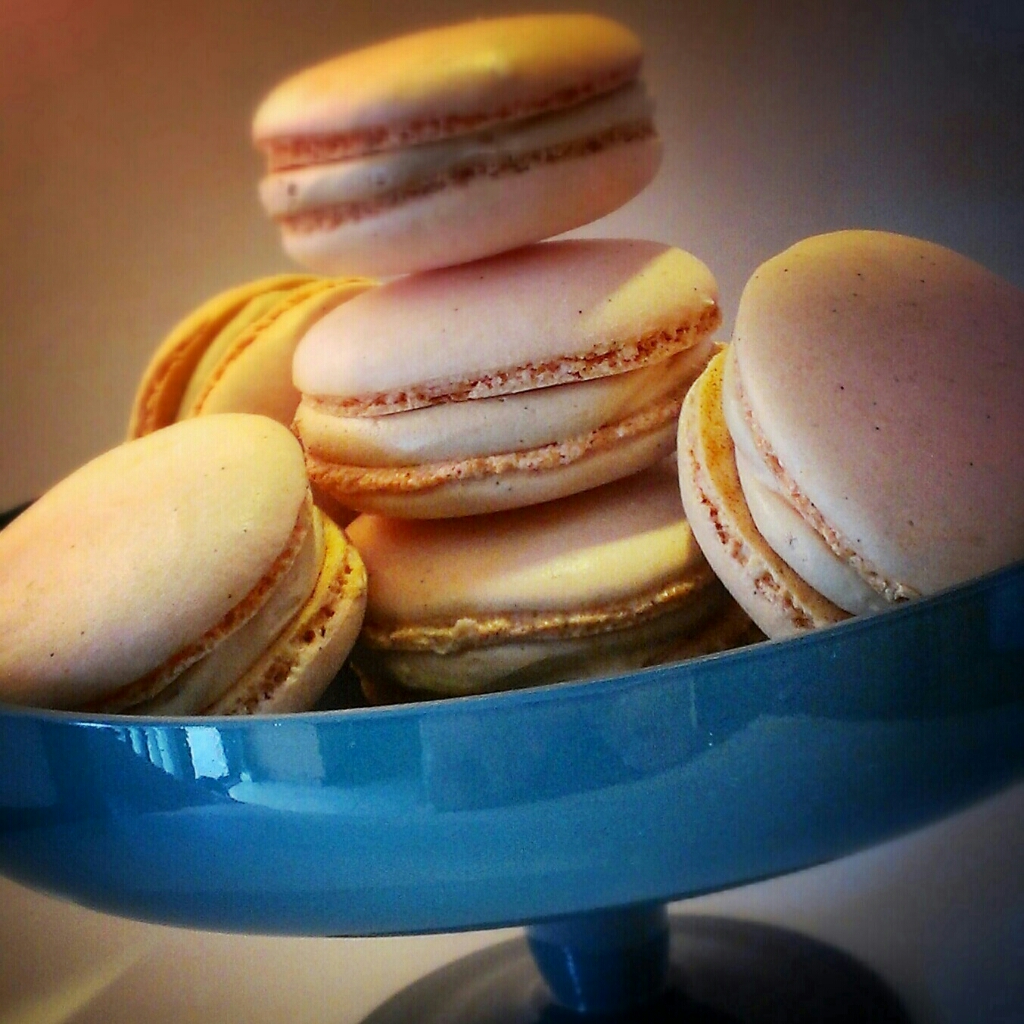
This is the end result...after being filled with some
Chili-Chocolate Caramel SMBC....


Yea, although they didn't ALL turn out like these pretty ones,
they were fan~tas~mic!!  All-in-all, I was pretty stoked
on how they turned out...esp. the way they
tasted!  Beauty of these, is that they truly are like a blank
canvas...ready to be flavored and colored to anything
that ...basically...floats your boat!
Cheesy, I know!  But you catch my drift...
know what I mean! (Yes, I'm from that generation)
 
Must've been a fluke tho...and
next batch will probably not turn
out as pretty...but at least they'll be deliciously
satisfying!!  So my ending suggestion is:
Try them~You might like love them!!
 
Thanks for the read ;)
Cori


Sunday, December 23, 2012

Oh the Weather Outside...

Everytime~literally~E.V.E.R.Y.T.I.M.E!!...a cold/cool front
comes thru my little corner of the world,
I get the need ~NO not for speed (movie reference;))~
but the need to BAKE. 
And not just bake some sort of extra-fat goodies, but
the need to bake--every.  single.  recipe.  that I have in
my arsenal!  Literally!!
 
Is that a bad thing?  I  think not! And I think 9 out of 10 test subjects
would agree with me on that fact.  By test subjects,
I mean those that sleep under my roof...and maybe a
 few select that don't.   
 
The way I see it, it's best to take advantage of
this nice weather because I can turn the a/c off--open up my windows--
that way, when I crank the oven on, it won't get
hot in here.  Come on, who doesn't
like a lower electric bill, huh?
 
Plus, I get to tease my neighbors
with the fan-tab-u-lous smells that
exude from my house--(don't be jealous ;))--
 as the breeze blows throughout!
 
Well, due to time (& energy) restrictions,
(Dr appt's, toddler that now--not just walks, but is running & getting
into literally...EVERYTHING,--hence, the lack of energy, etc)
I have had to reign myself in when it comes to baking time
....what a shame, I know!
 
I did manage to get SOME baking done...I baked cookies!
Yummy ones, too.  Both Sugar & Gingerbread
cookies~~and I must say, I've got a nice snack to go along with
my coffee now ;)
 
I snapped a few shots...take a look:


I am so bad when it comes to taking pictures of what I make...
that's why some of these are bagged...some of them
*ahem* were consumed, lol.
 
I will do my best to take pictures BEFOREHAND, next time
around...I promise...to try to remember ;)
 
Now, it being a nice cool day....
it's time to get myself a cup of coffee...some cookies...
a blanket...kick someone off my couch spot...
& finally, watch tv/movie!
 
Later--a gingerbread house! ;)
 
Thanx for stopping by,
 
Cori


Saturday, December 15, 2012

Fondant!

A few years ago, my oldest graduated!
Her party had an Alice in Wonderland Theme~
so needless to say, we had to have a quirky cake...you know,
things have to line up at times in girly life!!
 
I love baking...as you know...so being the over-achiever that I am,
I decided to make her cake myself!  I experimented
with a few recipes...found one that my
daughter really loved (Lemon~Raspberry)...I wasn't too thrilled with it
cuz of all the seeds...Y.U.K...they get all stuck
in your teeth & if you don't brush & floss your teeth right,
you'll be having those seeds for breakfast the next day...(Stop it~I did
warn you of the yukiness)...
 
During my quest, I also tried the Wilton fondant...&
 N.E.V.E.R....A.G.A.I.N.
So I went back to the drawing board (ok, the computer)
and I searched....and searched...and searched... 
till I finally found a recipe for homemade
rolled fondant.  At first I was really skeptical but when I finally decided to
try it out...WOW! It was REALLY good!!!
Kid's approved & asked that I never buy, ahem--"that crappy one",
again.   I absolutely vowed to make my own from
that point on.....
 
Although the fondant came out fan-tab-u-lous....due to time
restraints & work issues (yes, I had a real job back then), we decided to have
the cake made...it was really good tho!  Normal looking on the
outside, but swirly & colorful on the inside!
You know, kept it in line with the movie theme...
On a side note, I did manage to make several dozen cheesecake
 pops~which by the
way, also turned out fan-tab-u-lous!!!  That reminds me,
I've gotta make time to make those again ;)
 
So just this week, I decided to look for a BETTER Lemon~Raspberry
recipe for us to try out.  I also made the fondant
that we fell in love with...BUT, this time...I played with the play dough 
fondant and made flowers, birds, tree branches, leaves..you
know, girly stuff...all for decorating the cake.
 
I have watched SO many videos on decorations made of fondant,
but being the nerd & scaredy cat that I am...I came up with this...
Yea, pretty boring right?  Well, I kinda liked the way it looked~
but at the same time didn't (if that makes sense).
 
Then I remembered a video I saw that just AMAZED me...it was a post
from Elizabeth Adams (Arty McGoo).  In this video, she is
painting....yes, painting ....on cookies
(using food coloring~I think).
Anyway, it was just beautiful the way she ....turned that
cookie canvas into a work of art!!!
I've mentioned before of how little I know about art...painting included.
But being in a somewhat...daring mood...at this point, I
reasoned: "What the heck...give it a try.  This cake is really just
for us here at home.  If I fail...I fail....today."
So I broke out just a few food gel colors (Americolor~of course)
and my little pack of paint brushes (which are strictly for food!!!)
I quickly recalled how she worked the paint & brushes
with a little bit of water...So I went to
work!  This is what became
of my cake....
What do you think?  Epic Fail?  Eh-So-So?
or Fairly Decent--for a first timer?
Well, whatever you think, that's fine...I for my part...am Happy! 
Happy that I gave it a go!  Happy that it tastes good, at least!
& Happy that my family & friends liked it!
 
That is motivation in itself...to try again...& again...& again...
till ...well, till I reach perfection ;)
 
So......now we just gotta slice it up!
 
Leave me your thoughts, I'd love to hear them!
 
Thanks for stopping by!
 
Buenas Noches Amigos, Cori ;)


Thursday, November 22, 2012

Zumba Anyone?

I have a friend who happens to be a Zumba Dance Instructor.
She's attempted to get me to go to a class....
given me a couple of free passes and all....dangling Zumba water classes
in front of me...ALL TO NO AVAIL!:(
 
I know...I know...I know..I should go try it out at least once, right?!?!
What holds me back, you ask?
Well, a number of things...Firstly, the fact that I dare not try to wear
exercise clothing!  Just not meant to be worn by .........me. 
Secondly, I am not a fan of sore muscles!
I do not look forward to getting up to go pee (sorry, not meant to gross anyone out)
at 2 am only to find I have to "roll" off the bed
 because my thighs refuse to cooperate (a punishment they dish out
for my making them work-out...yes, they have a mind of
their own---don't yours?).  And thirdly, I DON'T DANCE!
To quote Fran (Bridgette Wilson-Sampras) from The Wedding Planner movie
"I look like a retarded string bean" ...or something along
those lines.  Yeah, I am SO NOT coordinated---never have been :(
 
I think I might have a change of mind...if I had a buddy (who's just as bad as me--
if not worse--at all three things noted above) who would go with me.
Unfortunately, we all run off different schedules--so for now, I
will just have to fulfill my friends other request....
which was to make her a batch of Zumba cookies for her class!
 
No problem there...she requested a batch of cookies that had the Zumba
symbol -- Here's the symbol she requested just above the cookie
I made. 
 
 
She prefers the cookie to show as opposed to have the icing go edge-to-edge.
Here they are all individually packaged and bow-tied!
 
Now this kinda Zumba, I can do!  They are sugar cookies with royal icing...simple,
but SOOOOOO good.  I'm sure these will give them something to work off
in class...so it's like I am actually there
with them, no? ;)
 
What do you think?  Close match?  Let me know.
 
Thanx,
 
Cori


Tuesday, November 20, 2012

Green Eggs & Ham

Okay, so my daughter is a big fan of Dr. Seuss...always has been...always will be. 
That's just who she is-----And we love you for that Em!   
So, one day while I was going thru online pictures (for inspiration, of course),
I came across some really cute Green Eggs & Ham cookies and I thought: "Hmm, MAYBE..
(just maybe) I can make these myself...?  What are the odds that I can do this?" 
And of course, there was that surge of anticipation in seeing my daughters
facial expression when she saw them IF I did succeed...<that was motivation
in itself ;)>  You see, I'm so NOT a good artist...so faaaarrrrrr
 from it, actually.   I do remember taking Art in High School....well,
maybe more like Jr High?...IDK, it was so long ago, I really can't
remember...(you can add that to the long list of things I've
 forgotten)  But what I do remember is that it was fun trying to make all those
sketches, paintings, paper mache projects, clay vases/pots, even the pinata...
of course, they were pretty horrible looking.....but it was a fun process.
 
SO I WENT FOR IT!!!!!!!  I pulled out all of my cookie cutters to see
which ones would fit the egg & ham shapes.  I decided to go
with the egg (as in egg that's still in a shell shape--before being cracked open)
as well as a plain round cutter.  I traced those 2 cutters on a
piece of paper & began sketching...
I used the round cutter and traced out what would look like
an over easy egg and I then traced the ham chunk on
the oval egg cutter.
 
After baking the cookies and letting them cool overnight,
I then took a black food coloring marker (edible, of course) and then I
lightly traced out the shapes according to the cutter sketches.  Once I was happy...
(still skeptical about how they would actually turn out) I bit the
bullet and started to outline the shape in black piping icing, like so--
and then I went ahead & piped the ham bone and egg yolk outlines, like so--
I let these dry out for about 30 min to an hour.  As you can see, the shapes
don't (more like shouldn't) have to be perfect.  Actually, they
end up looking more natural if each one is "off" a little bit,
but that's just my opinion.  If you like them to be exactly the same, then
go for it--whatever works for you is fine, too ;)
 
After these outlines were set and dry, I began flooding the cookies.  This is what
they look like after they were flooded--
Not so hot looking, right!  Yeah, I was pretty disappointed and thought "Great...I really do suck at this" :\  But, oh well...what can you do?!?!?
 
Well, I then realized....I wasn't done!!!!!  I let them dry .....
AND THEN...I took my lil black food coloring marker, and
started making all the little details on them!  And my-oh-my...I was once a happy
camper all over again!!!  Here's the final look of them--
Yay!!!   Not bad (if I do say so myself) for my first try, huh!  I know they aren't the
 greatest decorated cookies in the entire universe, but in my little corner
of the world...they are considered perfect---for me & my Em (she totally approved!
& everyone else that hangs around in my lil neck of the woods (there are no neck
 of the woods around here--really)....Bwahahahaha-hahah!
 
I think next time, I'll go thru our collection of Dr. Seuss books
and see what else I can bake up!
 
Thanx for hanging around my blog.  I hope you found it.....interesting?!?!?!
 
See ya next time,
 
Cori


Tuesday, October 30, 2012

Cleaning Cutters!

Cleaning up...NO ONE likes to do this!  Of course,
if I'm wrong & you know of someone out
 there who loves it...please send them my way! 
(Note: I can only afford to pay in cookies...no exceptions ;)) 
Oh yea, sure, the anticipation of creating
what's in my mind sends me over the moon (no, not literally...okay,
okay, well maybe a little)...
 
Then once the cookie is all iced and ready...
I have to convince myself to take a bite,  and believe me,
it doesn't takes a long time for that part ;)--wink wink--
 
If it's a success, then it'll be a miracle if the cookies survive the night!  And, NO! I don't eat 
them all myself--I do share with my hubby, kids and a few other family
& friends...but only because I want to make sure the weight
 gets distributed evenly between us! 
You know what they say:  "Sharing is Caring"
 
Boy oh boy, I can be on cloud 9 for days after a successful batch!  It's like nothing
else...it's a powerful thing! .........
..........
What were we talking 'bout?
.........
Oh, yea, Cleaning up those metal cookie cutters can be such a pain...esp those
 little suckers! Yes, the "mini" cutters--SO adorable, yet so
annoying to wash.  Maybe it's just me with my fragile hands, but I always seem to
 give myself a little nick or scratch from
 the edges &/or corners :(
 
I have read many blogs & I've yet to see one that gives tips about an easy way
to clean them (cutters) up...
But then again, I have an ugly habit of getting to the nitty gritty &
going straight to the good stuff on these blogs...
or maybe it's time I get my eyes checked again...
or...I could be in the early stages of memory loss...
hmm...memory loss......
.......
Cleaning Up...
 
Well, I just happen to have in my possession this little nifty tool--
It's inexpensive & highly accessible...
Yes...(drum roll)....
 
The Amazing Bottle Brush!
(ta da...)
 

I like to use the nipple brush for cleaning the icing tips...
 

Not only do the little threads on the tip of the brush get
in there and get the left over icing out...


But it's also good for getting into those tight little corners
on the cookie cutters...


Another trick I like for cleaning up is that I like to take advantage
 of the hot oven by letting the heat that radiates from it
dry both my icing tips as well as the cutters too...
 

All I do is lay a couple of napkins on the stove top and after I wash
the tips and cutters (& beaters, apparently) I place them
on the napkins--they dry completely within like 5 minutes!
(maybe even less)
 
Easy Peasy!
 
I don't have a dishwasher...well, aside from my kiddos & hubby........
So, I'm always looking to make things quick and simple
that way, I can get back to the more important things in my life---
like eating more cookies!
 
I just thought this simple little trick that has helped me,
might help you too!
If you guys have any other tricks, tips, or ideas that have worked for you,
please feel free to share them...I'd love to hear them, they're probably better than mine
so don't be shy!  Share! ;)
 
See ya,
Cori


Tuesday, October 16, 2012

My Sugar Dresses, Frames...& Catapillar Cookies

Ok, so the other day...I decided to try out a new--well, new to me--recipe that I came
across on "The Sweet Adventures of Sugarbelle" website (I absolutely LOVE her creativity
& think she is just amazing ;)).  What really caught my attention, was
that every couple of bites, you can get just a little hint of the
salt...not overwhelming, just a subtle taste in the background--and I
really love that about this recipe! 
 
I also read about Corn Syrup Glaze/Icing, which had never been on my radar before till now.  I adapted a couple of recipes of this icing..according to what I had on hand.  I am always nervous when I try something new, probly because it's just who I am ;)
I really found this icing to be extremely easy to work with!  I loved how
unhurried I was.  With royal icing, I am rushing to get each color batch done & sealed up
so that it doesn't dry out on me.  I always have my main bowl of it on the counter and, with so many kids in the house, I am double checking that the damp towel I place
over the container, isn't pulled off by accident...helping it dry out.
 
With the corn syrup glaze, I found that I didn't really need to keep it covered.
If it started to look like it wanted to, I just gave it a quick stir and boom!  I was
ready to go!  Another thing I noticed with this type of icing & how easy
it was to color it...I mean...W.O.W!  It took me by surprise how vivid the colors were. 
(* On a side note:  I was multi-tasking when I made the icing...AND...I didn't catch it till I was already stirring it all up--But I grabbed the regular vanilla bottle instead of the clear vanilla & so
my icing was an ivory/creamy tan color instead of white :(  Ooooops!  Good thing these
were just for us here at home, lol) 
 
That's something I'm going to have to watch out for (yes, both the clear vanilla & the brightness of the color mixes)!  Anyhoo, I paired these 2 recipes...along with my new cookie cutters and this is what resulted!
 
 
The one in the middle is what I like to think of as the "dancing dress" because as I
was lifting it to put it on the cookie sheet to bake, the dough kinda went too soft (as I live in a very hot & humid area) or I didn't leave it in the fridge long enough...either way, I think it looks cute!!
 
I also bought the plaque cutters from Karen's Cookies...and this is what I came up with.  Please keep in mind that I am a rookie and...well, yeah, I'm not there yet ;)  Here is the link: 


These catapillars were made just cuz I had extra dough and wanted to play with another
new cutter...So I decided to make them just for fun!
 
 
Well, back to family life!  Have a great night!
 
Cori ;)  


Wednesday, October 10, 2012

Some New Baking Tools!

I love new toys...which for me, are really kitchen/baking gadgets.  But don't tell that to my hubby...or that's what I'll get for our anniversary from here on out... I got these in a few days ago & I just used them.  I'm so excited about them, but now comes the hard part (well for me anyway) ...decorating them!  I get creative block when it comes time to decorate my cookies :/
I keep telling myself to remember all these fluttering ideas that come around just as I'm about to snooze, but my brain doesn't always do what I want it to...story of my life I guess...
In case ur wondering, I got these awesome cutters from Karen's Cookies...had been eyeing these beauties on other websites for a while, but couldn't bring myself to pay those pretty precious pennies for them.  Then came these...& (since I didn't win giveaway ツ)  I jumped at them right away.  Well, I'll have to post a picture of the final decorated cookie tomorrow...er, next time around;)